

Start Position

We covered the prerequisites of the Clean in the last article, much the same as the Snatch there was no mobility screening, However, contrary to the normal perception, I do find there are more mobility issues that arise that prevent a good Clean than there are for the snatch, so make sure you master the Front Squat first and have a solid rack position.
If you can’t Front Squat with a good rack position, thats what you should work towards first.
Once the Front Squat is mastered, just like the Snatch, I would go on to teach the Clean top down. Cover the Hang Clean from mid thigh, eventually working down the leg eventually to the floor. As and when the lifter is ready, bending the stipulations and coming up with complexes using movements the lifter has already been taught as and when applicable. There’s no one size fits all, but a top down approach as a basis of learning certainly works the best.
However, I plan for this series to be used more as reference material to troubleshoot, rather than a path of learning for a beginner. If you’re a beginner, seek out a reputable coach to learn from and not this series of articles, so for that reason I will be running through the lift bottom up the way you would perform it.
So, onto the Start Position…
The Start Position
Funnily enough, just like in the Snatch, the start position of the Clean is everything and its sole purpose is to optimise the rest of the lift.
If you get it wrong from the floor, there will be a knock on effect of errors correcting errors all the way through the 1st pull, 2nd pull, turnover and right into the catch meaning more effort used standing up and a harder Jerk.
In the Snatch, most misses will come from inadequate technique, this isn’t as prevalent in the clean (unless you’re a beginner with inconsistent technique) due to the extra weight on the bar and the higher correlation between Front Squat strength and Clean strength as opposed to Back Squat strength and Snatch strength.
That being said, there’s not one perfect start position and not everyones start position will look the same and its more of a case that theres a frame work to follow, just like the top down approach I described above when it comes to coaching.
While I don’t necessarily think its important for the athlete to understand why their start position may differ to someone else in terms of anatomy (thats for the coach to worry about), I do think it is important for them to understand what key positions we are trying to achieve from it.
With that in mind, while what I’m about to give you are key pieces of information regarding the start position, they will fall into a spectrum. I’ll also put them in the order I do them as I approach and take hold of the bar, giving you a kind of mental checklist.

Bar Position over the Foot
Before you take hold of the bar, the barbell should be set roughly over the balls of the foot.
Why do we this?
Because it gives us the ability and space to allow the knees to travel forwards when setting up in the start position.
This space allows us to achieve lower hips and a more upright torso with the shoulder joint directly over or just in front of the barbell giving us the ability to utilise the quads in the pull and eventually giving us a more vertical extension to negate a catapult effect after contact.
From the ground to the knee it also gives the knees room to move backwards out the way of the barbell while keeping the bar as close to our centre of mass as possible, allowing the bar to either move vertically up, or up and slightly back off the floor without the need to travel out and around the knee as it passes.
Will you pull the most weight you’ve ever pulled this way? Probably not, but it will set you up for an efficient bar path in the Clean.
While the bar will usually start somewhere over the ball of the foot for 90% of lifters, its not an exact science and some shorter lifters might get away with a little closer, while some taller lifters might have to push it further away.
That being said, at no point should the bar start so far away that its past your toe and outside of your area of balance, or so far back that it restricts the forward movement of the shin.
Foot Position
Foot Position will vary from lifter to lifter and once again theres no one perfect position, a good starting point however is with the feet under the hips and with the feet turned out anywhere between 10 to 30 degrees.
Personally I prefer the feet slightly less turned out than in the Snatch. I’ve found better results with that overall, as it allows the heels to remain under the hips with the narrower grip due to the knees being less pointed out.
If you have relatively long femurs you might find you need to turn your feet out a little more than someone else as doing so will artificially shorten the femur allowing for a more vertical torso position.

I’m aware this is a picture of the feet in the Snatch start position, but you get the idea of the differences between athletes as the same goes for the clean.
If you have longer shins you might find you have to move to a more narrow stance, again with the feet turned out a little more to artificially shortening the shins. Both of these work due to the manipulation of the degree of external rotation at the hip.
Grip
Next I’d take my grip. We ran through grip width and the hook grip in the last post on Clean Prerequisites, its exactly the same.
If you haven’t read it… Click the link and go do so.

Clean Prerequisites
Scapula & Bracing
Once you’re positioned in relation to the bar, with the feet and hands set, I’d then set my scapula.
I hear a lot about ‘tightening the lats’, or ‘pinching oranges in the armpits’ and to be honest, I dislike both cue’s as in my experience this generally just leads to tight rigid arms through the pull and also turns the elbows back over through external rotation of the shoulder joint.
I prefer to think about setting the shoulder blades back and down (Scapula Depression).
Doing so will do 3 things.
It will brace and extend the upper back while also creating a ‘proud chest’ helping to maintain that upright torso.
It will put the rest of the back into very slight extension, essentially shortening the length of the back creating a more optimal lever arm for the back extensor muscles to work with and brace.
It will allow the shoulders to remain in a more neutral position within the joint allowing the elbows to point more out over rather than back over, something that I find tightening the lats doesn’t do.
Take your bracing breath just before you set your scapula with the hips high.
If you try to set the scapula, or brace once your into something resembling the ‘start position’ theres no way you’ll be able to maximise pressure in the abdomen making it nigh on impossible to brace maximally and hit those heavier weights.
Pulling Tight and getting into the Start Position
Once the Scapula is set, its time to pull yourself tight. Make sure you do this without pulling the bar towards you.
Its no good setting your feet correctly in relation to the barbell if you pull it in towards the shin when you pull tight, essentially taking away the room we created for the shin to move forward into the start position and the ability to keep a more vertical torso. It’s something a lot of lifters do, is easy to miss when trouble shooting and can be the cause of the bar having to swing out around the knee in the pull.
If you find you do this as a habit and it kills your start position, something I’ve found helps is to put a bit of broken exercise band or a change plate behind the bumpers to prevent the barbell rolling. Obviously at some point you’ll have to take them away but as a cueing exercise it works.
Forget about your Hips & Back Angle
British Weightlifting teaches hips higher than knees, shoulders higher than hips & shoulders over the bar or something along those lines, I can’t remember the exact wording.
While this is largely true, I’d like you to forget about hip height as they’ll be set largely by your proportions and hitting the key points I’m talking about within this article. Along with that, there are odd occasions where a lifter has proportions that have them lift with the hips at the same height, or slightly below the knee in the start position.
I’d also like you to forget about back angle for now too as that will also be set by proportions and the only time its really important to worry about is when trying to maintain it during the first pull which we’ll talk about in the next article.
That being said, its not all variable and there are some key points and positions to remember when it comes to the start position of the Clean.
That being said, the torso will be more upright in the Clean than in the Snatch.
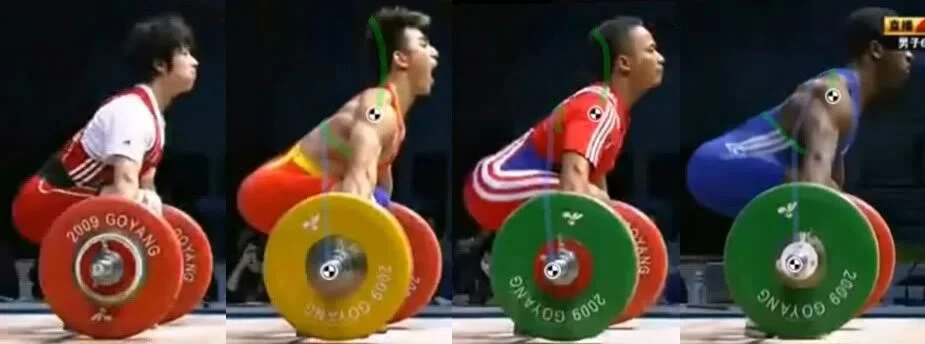
Notice each lifter has a slightly different back angle and hip height yet all of them have their shoulder joint directly above the bar giving them vertical arms when looked at from a side view.
Shoulders
Your shoulder joint should be set directly above or slightly in front of the bar.
A lot of coaches tell their athletes to get their shoulders over the bar and I feel this is a misunderstanding and not overly specific of an instruction.
‘Shoulders over the bar’… How far over?
In reality your shoulder joint should be set directly above or only slightly in front of the bar, this will put the leading edge of your delt in front of the bar, which is where I feel a lot the confusion comes from.
If you’re unsure if your shoulder joint is positioned correctly in relation to the bar, take a picture from side on or get someone to take a look. With your shoulder joint directly above the bar your arms will appear either vertical, or with a very slight backward angle from shoulder to hand from side on.
The reason we want the shoulder joint pretty much directly above the bar is because we don’t want to have to work too hard to keep the bar close. If the shoulders are too far ahead of the bar you’ll likely end up using the lats, or arms to try to pull it close during the pull causing everything to go tight and killing the timing, contact and turnover further down the line.
Knees
Your knees will travel forwards when you pull yourself tight and will at least be directly over the bar if not a little in front and pushed out towards the insides of the elbows, this will help the bar pass the knees more easily through effectively shortening lower limb lengths while also creating more mobility in the hip making it easier to find that tightness required in the start position.
The knees will likely be making contact with the inside of the elbows, but its not set in stone, so if your not and everything else is right don’t worry about it.
Elbows
The elbows should be pointed out over, which will improve bar path in the turnover.
Remember when I talked about the scapula? Tightening the lats will most likely result in external rotation at the shouler joint, which in turn will point the elbows back which will cause the bar to ‘loop’ more in the turnover.
I find setting the scapula allows the shoulder joint to remain free to be slightly internally rotated allowing the elbows to point out over across the bar to a higher degree. This will improve turnover mechanics and allow the bar to remain closer after contact as it travels overhead… it’ll also naturally negate any ability to pull early with the arms.
If you pull early with the arms, the cue elbows out often works well.
Weight Distribution
The weight will be towards the balls of your feet with your heels still contacting the ground.
Head and Eyes
The head will always be up and directed straight ahead, which will help to maintain posture and position.
Finally and something that gets glossed over and not covered a great deal.
Where you look is important, if your eyes are down, your head will follow and then everything else causing you to lose posture and position. On top of that, looking at something will help you to know where you are in free space allowing you to move more confidently, precisely and with more control. Where you look is absolutely personal preference, but anything between straight ahead and around a 45 degree angle should serve you well. Just pick something and focus on it.
Summary
For me, just like in the Snatch, there’s almost two parts, two setups to get right in the start position of the Clean.
A ‘pre start position’ where you set your feet, hands, scapulas and abdominal bracing.
Then an actual start position setup where you pull tight into the start position that will allow you to lift where you set your shoulders, the rest of your body angles, your weight distribution and eyes… or at least thats how I approach it and break it down for my athletes.
Incase you need it, heres a mental checklist and something that I go through as I approach and set-up to the bar.
Feet - I set my feet to their usual pulling stance, probably a little less turned out than in the Snatch and using the relation between the start of the knurling and the loops on my shoes to know I’m being consistent.
Grip - bend at the hip and take a grip on the bar. There’s more scope for different grips in the Clean than there is in the Snatch as its slightly less pre determined by proportion. Just make sure you’re consistent and the most important thing is that it puts you in the optimal position for your front rack when you turn over.
Take a breath and brace - Take a big belly breath to brace your core, when it gets heavy, just contracting the muscles isn’t enough.
Set the scapula back - as discussed above.
Pull tight - By lowering your hips and allowing the knees to move forward ensuring your weight is towards the balls of the feet, shoulder joint is above the bar and that the bar doesn’t roll back towards you.
Pick something to look at - Just pick something to look at and concentrate on. I have a specific crack in the wall that I stare at for each different platform at FSI.
That was a lot of info!
We’ll finish there, but now you’re ready to break the bar off the floor.
I’m sorry if you’ve already read the Snatch start position article and feel duped. Many of the cues are exactly the same so largely all i’ve had to do is re word this article and add a few extra things.
Much like weightlifting, it can be as hard or as easy as needed… depending what path you take.
Adam Johnston, 14th December 2020